Showing posts with label Workbench. Show all posts

Monday, April 19, 2010

Wood-burning 101: Pyrography & the Butt-Ugly Panel


In past posts, I've given some attention to how surface imperfections and flaws need to be planned for. It is both an aggravation and an attraction for the pyrographic artist. A pyrographer often must affect a more conscious relationship with wood than many artists do their respective mediums. Wood is far more than a canvas. Each piece is as unique as a fingerprint and each brings to our table is own peculiarities in densities, moisture and grain. A pyrographic artist learns quickly to train his hand, and with it the hot tool, to respond to how the wood surface is acting as he works. In planning an image we hope to burn, we often find ourselves with a pyrographic truism: what can't be ignored must be used.

A variety of species tool very well with a woodburner. Bass and poplar will always be personal favorites of mine. Owing to its relative inexpensiveness and that most of my pieces have ended up on furniture items, most of my time has been spent with pine. Generally speaking, pine takes a burner very nicely and usually has accommodating grain features. It can also be nightmarish when it comes to knots and surface defects. These days, when working with pine, I most often let the panel decide what it will become. Nature presents us with certain challenges. Letting our imaginations run rampant with them is precisely part of the magic for the pyrographic artist.
We often find ourselves with panels that are just ugly. This one, for example...


This panel is actually a single board, 4 feet long and with widths as wide as 2. It is just under two inches thick. Both the top and bottom edges are "live edge," meaning that edge had been the exterior surface of the tree. It had bark...and often becomes stunning furniture. This particular panel is destined to become a coffee table. We just have to get it well past its current ugly duckling stage.

The most obvious challenge presented us here are this panel's knots. There are 3 bands of them, right up the middle and on both sides. They are too large and defined to be ignored, so they must be used. Laid out in "bands" as they are, they strike me as just calling out to become trees. I frequently like using knots to this end as they incorporate themselves very readily into such images.
They are not, however, without their issues. Most often, there will be moisture (i.e. dried/drying sap) associated with these knots, even in very seasoned wood. When your burner tip comes into contact with this, the heat draws it to the surface and you will hear it sizzle. Notice the smoke rolling back from my burner here:
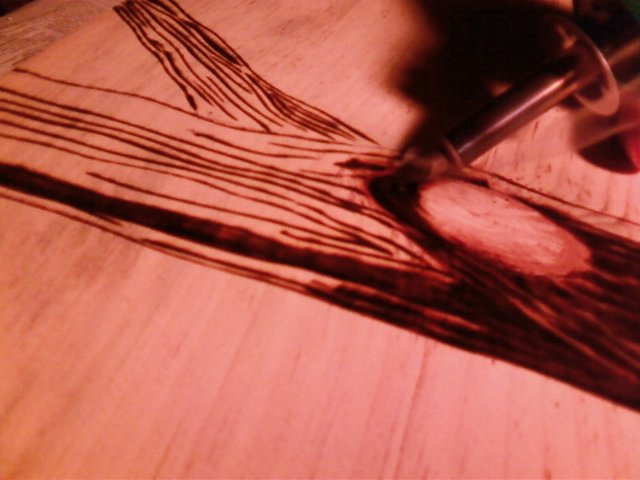


Knots and their surrounding surfaces are denser and tend to burn (i.e. darken) more slowly. The melted sap, which caramelizes as we go, helps slow the process even further. The result, incorporating what would be a very intrusive knot into the image itself, is usually worth the added patience.

I've found that using a 25-watt burner to be invaluable. Pine knots can be hard on the more-delicate 20-watt hot tool (my preferred burner). The heavier 25-watt tool not only takes the abuse better but also darkens the surface more quickly in the bargain. In the above picture, this stouter hot tool acquits itself nicely in helping to "form" the knot into the end-grain of a broken tree limb.

With the trees (as good a starting point as any...) established, the picture is taking shape. At this point, the problems which made this panel such an initial challenge, are actually resolved. All that's left is straight-forward pyrography and composition...


(My work companion, wholly unimpressed with the artistic process...)


In bringing things closer to completion, I found myself with an opportunity to truly "paint with fire" ...or at least to use open flame to affect some of the heavier shades along the larger tree trunks.


Such opportunities present themselves very infrequently for me. Flame is an exceedingly unpredictable tool. It's rather like using a broad axe instead of a scalpel. One tends to bite the inside of one's cheek (not that I, uhm, er, ever do...) when taking open flame to a piece in which he's already invested so many hours. It is a gamble. Flame can char too deeply without warning. Occasionally your piece catches fire.

Each piece presents its unique headaches and challenges. Finding their resolution is part of the magic of pyrography. The character of a piece, its knots and defects, inform the vision. Together, they are bound only by the limits of our imaginations...

Sunday, September 6, 2009

From the Workbench: Woodspeak

From the Workbench...


I will always maintain that if you wait long enough, the wood will tell you what it wants to be. This strikes most as pure gibberish; but you know what they say: "If ya gotta ask, you just wouldn't understand..."

Every piece of wood, no matter how similar, is as unique as a fingerprint. Woodgrain is never repeated in nature, not once. For even the novice woodworker, we discover early on that there is an inherent beauty to each piece, be it the caramel striping one often finds in pine or how the grain achieves an effect, and often the very illusion, of running water.

For burning purposes, I've used a wide variety of species over the years and I do have my favorites. For the fairly high-detailed burns such as Marilyn and The Smith, I've come to favor a 1/4-inch birch laminate plywood. As you can see from especially the earlier pics, these provide a very clean surface, reducing almost any need to have to plan and work around surface defects. The birch also takes a burner nicely. It is also inexpensive, which I also find a bonus. Basswood, which I actually do prefer owing to its softer qualities, will run you quite a bit more. I've also found polar to be a very cooperative wood as well.

Hands down, most of my burnings have ended up on pine. Comparatively speaking, it's fairly inexpensive and can be found virtually anywhere. It tools very well with a burner, though (being pine) it frequently serves you up some challenges when it comes to layout and "letting the wood tell you" what will happen here.

These two pieces of stock are waiting in the work queue. The bottom piece measures 48" long and is roughly 22" wide. From a woodburner's perspective, it's ugly, like "he's so ugly it's like his face caught fire and they beat it out with a shovel." That kinda ugly. The big knots you see are one of 3 bands of those big bad boys that stripe this panel side-to-side. Further, it's rife with patches of pitch and a bluish mold I've heard referred to a "pasture pine." Personally, I've found "pasture pine" to be quite striking, but when it comes to burning it, it's helpful to remember that it burns darker (and more quickly) than the wood around it. In short, you're still likely to see it through the finished burn.

Were it not for the larger panel's edges, I'd be less pleased with the prospect of working it. As it is, I'm looking forward to it. It is, in fact, not a "panel" at all, but a single board with "live edge" sides, meaning the wood on both sides of this board had been on the outside of the tree. These boards can make stunning furniture, which is where this one is destined. Farmer Dave has plans to turn this one and its sister board into tables. Knowing full well just how talented a woodworker Dave is, and how mint this table will be when he's done with it, I have to come up with something that won't detract.

The smaller of the two boards pictured is a panel and presents some challenges of its own. The dark, heavy stripe comes from the heartwood of the tree and you will see it when whatever you burn over it is done. As it is too large to be ignored, it really has to be incorporated into the burning itself, along with that fairly pronounced knot next to it.

When I look at a panel with, especially a variety of knots and defects, I pretty much already know it's going to end up as a forest scene. As themes go, such scenes are as perfect as it gets to incorporate what nature won't let you escape. In this vertical orientation (my original thought), I was thinking a whitetail deer buck. The heartwood stripe could then be easily swallowed into the bark of a tree next to/slightly behind the deer. I have opted against this, since the rack of the buck's antlers would have to pass over the terminus of the heartwood and still have enough space to be represented beneath the top edge. Further, whether this piece ends up framed or incorporated into a table, I must keep mindful that it will lose app. 3/4 of an inch, where it fits beneath the frame. I'd rather not lose the tips of the antlers that way, and to make the deer smaller would be at the cost of the scale I wished to achieve.

So we look at it this way, in the horizontal orientation. The vertical dark pencil line is actually the future edge of this panel as it has been conceived as a companion piece for "Woodland Morn, #1," one of the "gallery" images riding the right margin. This also explains why I'm most interested in continuing the deer theme onto this piece. As this panel is slightly larger than its sister, I'll cut it to size just before its framed.

In the horizontal, that annoying heartwood is begging to become part of the bark contours for a fallen tree. The crescent pencil lines and arrows indicate a limb on this deadfall, with the crotch of where it joins the trunk at the topmost line. With the scene taking shape in this manner, I gotta say that the notch of this deadfall is just aching for a sleeping fawn.

In such ways, the wood whispers to us all...